Office Address
123/A, Miranda City Likaoli Prikano, Dope
Phone Number
+0989 7876 9865 9
+(090) 8765 86543 85


123/A, Miranda City Likaoli Prikano, Dope
+0989 7876 9865 9
+(090) 8765 86543 85
Outlook is a popular email service that comes packed with many functionalities like task manager, webmail, and contact manager, among others. It helps its users to manage their emails efficiently. However, people may sometimes encounter trouble in sending or receiving their emails or messages. There are many factors that may cause users to face Outlook send/receive error. Various reasons like faulty email account settings, internet issues, and corrupt Outlook data files may cause you to experience this error. But there are ways to resolve it by yourself. In this article, you’ll learn about this error in detail and how to fix it.
There are various possible send/receive errors that may occur when you attempt sending an email message from the MS Outlook application. You can come across multiple issues when you use this application for sending and receiving messages. Outlook users can face a myriad of errors instead of a single message sending/receiving error while they work on Microsoft Outlook. These errors include the no connection error, Outlook send to receive an error, Outlook send-and-receive error 0x80040610, and Outlook error while preparing to send sharing message.
Apart from that, there are also Outlook 365 send to receive an error and operation timed out (POP) server 0x8004210a error. These errors are a result of a kind of discrepancy in fulfilling the precise requirements of the internet connection or server. Given below is a list of common Outlook errors that you can possibly encounter. After that, you’ll learn about the reasons and resolutions for the send and receive error.
Various causes may lead you to experience this error in sending and receiving messages. Common points are given below that you can check.
After implementing each of the methods below, try sending yourself a test email message. If you are able to send and receive the message without facing any error, it means that you have solved the problem.
To begin, launch Outlook and choose the account for which you desire to verify the email account settings. Follow these steps below.
Outgoing server settings verification
Check the settings given below.
Advanced settings verification
When you tap the ‘Advanced‘ tab, you’ll notice the values mentioned below on your screen.
For Outlook 2016 version, the values will be as follows:
If everything seems fine to you, tap ‘OK‘ and exit the ‘Internet Email Settings window.
Test the settings
Whenever you encounter the send/receive error Outlook, it’s important to inspect the speed of your internet. If you have a poor net connection, you won’t be able to send or receive emails. To check internet connection, follow these points.
Windows Firewall hinders seamless access to Outlook. So this error arises. The Outlook send/receive error often happens because of an antivirus installed on the user’s computer. You can disable the antivirus program or Firewall for some time and then use Outlook to receive and send emails.
By default, the duration of server timeout in Outlook is one minute. If you send emails with large attachments, the default server timeout will be inadequate. It will lead your emails to get stuck in the outbox. So, it is necessary to clear the outbox and enhance the duration of server timeout. To modify server timeout, go through these steps.
This action will enable you to receive or send emails of bigger sizes.
If your inbox contains any suspicious emails, you may face Outlook send/receive error. In this case, delete such messages by going through these steps.
A PST file is a private folder/file in Outlook that contains email contacts, memos, notes, messages, and personal information. If this file gets corrupt, you cannot send any email. You will not receive any new emails in the application. When the PST file is corrupt, you must repair it by following these points.
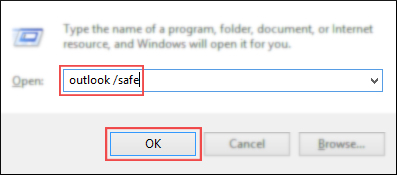
Running the application in the Safe Mode can quickly fix the Outlook send receive an error. Sometimes incompatible add-ins prevent Outlook from sending or receiving emails. When this happens, you can launch the application in the Safe Mode and then send emails. To do so, type outlook.exe/safe on the search box and hit Enter. Outlook will open in the Safe Mode.
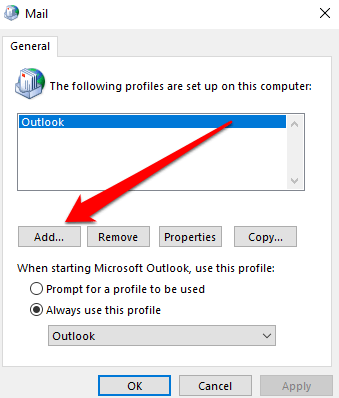
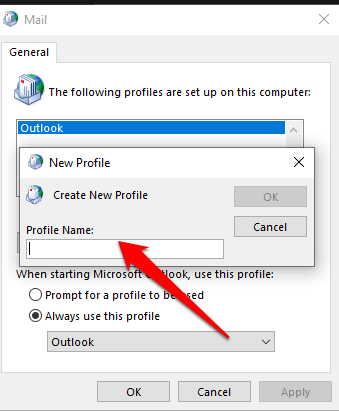
To make sure that your present email profile is working correctly in Outlook, you will need to create a new email profile. Suppose you are able to receive and send messages by the new profile and do not encounter any send receive an error. In that case, it means that you need to set your newly created profile as the default one. To create a new profile, follow these points.
If you discover that the Mapi32.dll file is corrupt or damaged, you may face the send receive error in Outlook. To resolve this error, you can run the Mapi repair tool. It is a program interface utilized in Microsoft Windows. It enables you to send an email from within a program. You can find this tool in any of the folders below.
After going through this comprehensive guide, you’ll feel confident to fix the Outlook send receive error. Follow each fix until you find one that gives you the desired result. If you get any doubts about these methods, contact professional Outlook customer support services. The support professionals are there to answer your queries and help you any time of the day.
Related Post: Outlook Not Opening
HP printers get massively utilized in schools, offices, and household settings. They can print practically anything from colored photos to office documents and reports. Nevertheless, the printing devices from HP have certain flaws that can leave people confused and annoyed. One of the most infuriating situations occurs when users find their HP printer printing blank pages. The problem can arise suddenly and halt any kind of work you may be doing. But there are ways to fix it efficiently. The problem is due to particular causes, and when the user addresses them, they can work with their printing device. In this article, you’ll find how you can get rid of this problem.
For fixing this problem, you need to know its causes. When your HP printer is not giving you the desired output, it can be a result of various factors. If you don’t know about them, you may wonder why is my HP printer printing blank pages? The most probable reasons are as follows.
After you know the causes behind your printer printing blank pages, it’s time to implement a suitable technique according to what you think is the cause. There are many quick and easy fixes for this problem. All of them are given in a detailed manner below.
Related Post:
HP recommends that every printer owner use original ink cartridges from the brand. It’s because these original cartridges cause no harm to your printing device. They also minimize the likelihood of your printer suffering from various errors. Moreover, genuine HP cartridges increase the lifespan of your device. On the contrary, if you use cheap ones that are not from the HP brand, your printing device will be prone to many long-term damages.
Another thing to check when you find your HP printer printing blank pages is its ink levels. When there are low ink levels or the ink cartridge is empty, your printer will be unable to print. Go through these steps to inspect the ink levels in your printer.
Related Post:
HP Printer driver is unavailable
When the HP printer prints blank pages, it perplexes the user. They may wonder why my printer is printing blank pages. Well, it might be because of old cartridges. Changing or replacing them can fix this problem. But you need to follow the process for switching them very carefully. Change the cartridges when your printer is idle. Follow these points for it.
This resolution will work best for all those Windows 7, 8, and 10 users who are wondering why is my printer printing blank pages? You can resolve this problem by using the Windows troubleshooter. It is a Microsoft in-built utility that automatically identifies and troubleshoots common printer problems. In the following part of this article, you’ll find how to use the tool on Windows 7 and 8 and Windows 10.
The driver is a program that allows your hardware and computer to function together. If you haven’t correctly installed the driver on your system, your printing device will not function properly. You’ll thus find yourself dealing with blank page problems more frequently. When some problem occurs with your driver, you should always think of updating it. HP updates its drivers regularly.
To get the most current driver, navigate to the support page of the official HP website. Here you can find a driver that’s compatible with the Windows version you’ve installed on your system. You can then download this driver from the website manually.
After downloading the driver, double-tap its downloaded file. Then adhere to the instructions on the screen for installing the driver properly.
Even if you have an updated printer driver, there are chances that it might be corrupt. So, you can uninstall and reinstall the driver when you find your HP printer printing blank pages. Follow the directions given below to reinstall the printer driver.
If you’ve tried the resolutions above but still find that the problem persists, you may wonder why my HP printer is printing blank pages. At this time, you can utilize the HP Print and Scan Doctor, which is a free tool to troubleshoot the problem in your printer. Go through these steps to download and use the tool.
You may find your HP printer printing blank pages due to damaged printer spooler files on your computer. You can restore the spooler service files and eliminate this problem. Here’s the process you should follow for configuring the printer spooler service.
Related Post:
Clogged nozzles make your HP printer print blank pages. When you clean the printhead, you can find the pages getting printed as you want them. Follow the points below for cleaning the printhead through the ‘Control Panel‘ of your HP printer.
You can sometimes find your HP printer printing blank pages before performing any job. It occurs because the cover or separation page option has been mistakenly left turned on. Go through these steps to turn off this option.
Implement the resolutions in this article whenever you find your HP printing device giving a blank output. They are quite simple to understand and follow. If you have any doubts about these troubleshooting techniques, feel free to contact professional HP printer support. The experts will readily resolve all problems you face with your HP device.
Related Post:
Epson printers are known worldwide for providing one of the best printing services. However, despite having a high performance, these printers experience many types of problems. One of the most prevalent ones is regarding the Epson printer printing blank pages. When users get blank pages from the printer, it’s referred to as a blank page error. In most cases, the error is a result of low ink levels in the ink cartridge or incorrect print settings. It’s essential for you to find the exact causes of this error to resolve it effectively. In this article, you’ll find the various reasons for this error and what you can do to fix it.
Different people face this error because of various reasons. To help you pinpoint exactly what may be causing this problem, here are a few of the most common causes.
Related Post:
| Epson Printer Offline | Epson Printer In Error State |
It may be possible that you are finding your printer printing blank pages due to some minor issues. So, it’s wise to check for the following before you start implementing the troubleshooting procedures.
By now, you must know the answer to why is my Epson printer printing blank pages. You can understand and follow different troubleshooting techniques and get rid of this issue.
The first thing you must do whenever your Epson printer starts printing blank pages is check the ink cartridges. There are three situations in doing so.
The first is when the ink level is low. In this case, replace the cartridge and resolve the problem. The second condition is when a single cartridge is out of ink. According to the Epson manual, you cannot print when a single ink cartridge is expended even if the others are not. When one of the cartridges is expended, substitute it with a new one. If you don’t do it, the printer will print blank pages.
The third situation is when you have substituted a cartridge, but you didn’t remove the protected tape. The new cartridges feature protective tape to prevent ink from leaking. It also protects the print nozzles. Here, be cautious with the extra transparent plastic. Don’t take it away. Otherwise, the cartridge will malfunction.
Suppose you encounter your Epson printer printing blank pages even after refilling or changing the ink cartridges. In that case, you need to check for clogging in the printhead. You should command a ‘Print a nozzle check pattern’, but before it, ensure that there are no errors being indicated by the LCD screen of your printer. Follow the steps below.
Another reason you might wonder why is my printer printing blank pages relates to a printer driver that’s not updated. An outdated printer driver version is a leading cause for users facing this problem. The solution for it is to update the Epson printer driver. To do it, follow these steps.
Your Epson printer software for Windows checks for the driver updates automatically. But you can also modify or configure how frequently the Epson printer software should check for updates. Follow these steps for it.
Often, an obsolete firmware version may cause your Epson printer print blank pages.’ Your printer will start to operate efficiently when you update its firmware with the current version. If you have a Windows 10 system, you can update the firmware by tapping on the ‘Start’ menu and navigating to the option of ‘Epson Software Updater.’ But if you do not have the utility of Epson Software Updater on your windows system, you can follow these steps.
Another expert resolution for the Epson printer printing blank pages problem is to make changes to the printing preferences. You should enter the printing preferences and check that you have selected the option of ‘Skip Blank Page.’ Below are the steps to change printing preferences on Windows Vista, Windows 7, Windows 8, and Windows 10.
Many printer problems are associated with corrupted system files. Reimage is a great tool that repairs and rebuilds Windows. The tool is tailored to your particular system and works in an automatic and private way. You don’t need to be bothered of any loss to your personal data or programs. It will also not harm your computer in any way. You can use it by adhering to these steps.
Hopefully, the various solutions outlined above will help you successfully troubleshoot the blank page printing problem in your Epson printer. These solutions are apt for various Windows version users. But if your printer still prints blank pages, you can directly connect with Epson printer support. The support service works 24/7, and you can avail yourself of the help of expert technicians anytime.
Outlook is a dynamic and feature-rich email client that comes from Microsoft. This email client helps people seamlessly manage their emails. But there may also be numerous times when people experience problems like Outlook not opening. This problem can seem frustrating and annoying for people who are using it to view, send, or receive an urgent email. There are several troubleshooting solutions that you can use to enable your Outlook to run smoothly as before. But the fix you use will depend on what you are experiencing and the MS Outlook version you are using. In this article, you’ll read about some of the common fixes that are effective in getting rid of this problem.
There is not one but many causes behind this problem. If you are wondering why won’t Outlook open, these causes may be behind it.
There’s no need to worry about finding that Outlook won’t open. There are several troubleshooting steps you can take and fix this issue.
It is the first step you can take whenever you face problems opening the Outlook application. If you find it open in the Safe Mode, it means the problem lies with an add-on or a toolbar extension. You can open the application in Safe Mode by using a command prompt. Follow these steps.

Another effective method is to launch the Windows Task Manager. Follow the steps below to troubleshoot MS Outlook through this method.
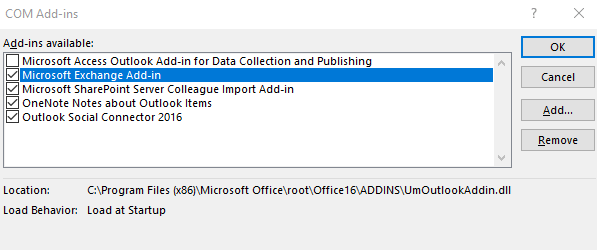
If you’ve tried the methods above, but they have not yielded results, you may still ask why my Outlook won’t open. Defective add-ins in Safe Mode can be the culprit behind the problem. Add-ins are integrated into Outlook. They can be obsolete or defective and hinder Outlook from opening. The add-ins can be conflicting with this desktop client. You need to disable every add-in and check if this application is opening as usual.

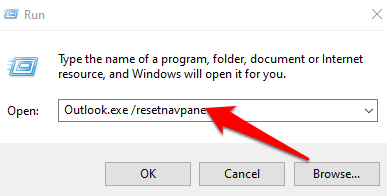
This step entails resetting the navigation pane with the outlook.exe/resetnavpanel command. You can find the navigation pane on the left edge of the Outlook window. It has the folder list and items like ‘Contacts’, ‘Notes’, ‘Tasks’, ‘Email’, and ‘Calendar.’ You can adjust this area as per your preferences. However, the individualizations can cause severe errors that may result in Outlook not opening on Windows 10. The resolution for it is to revert the navigation pane to the default setting. Implement the following steps.
Are you still wondering why is Outlook not opening? It may be that your personal folders file (.pst file) is faulty. A .pst file has every calendar entry, email, notes, task, and content that are related to your Outlook profile. An Outlook.pst is made the first time that you start this Microsoft application. But you can also create. PST files by yourself. If you feel that the problem is being caused by a faulty Outlook profile, follow the steps below.
If you find Outlook not opening on your device, it’s highly possible that the application is damaged. You can repair the application by using the in-built Microsoft Office Repair Utility. To repair the Outlook application, follow these steps:
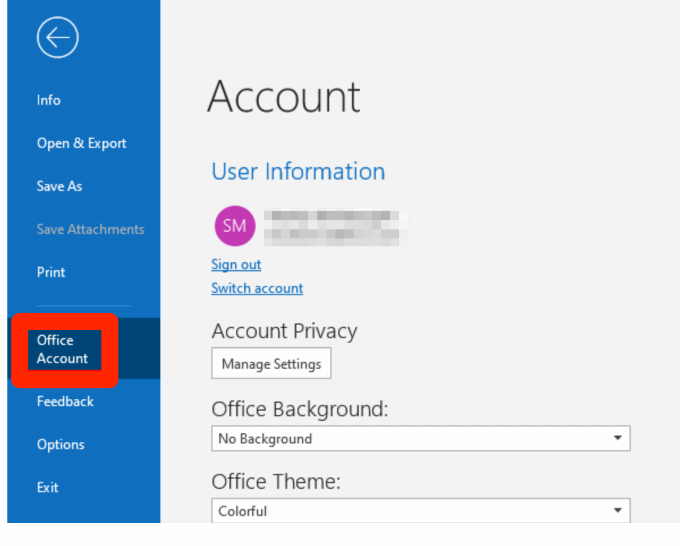
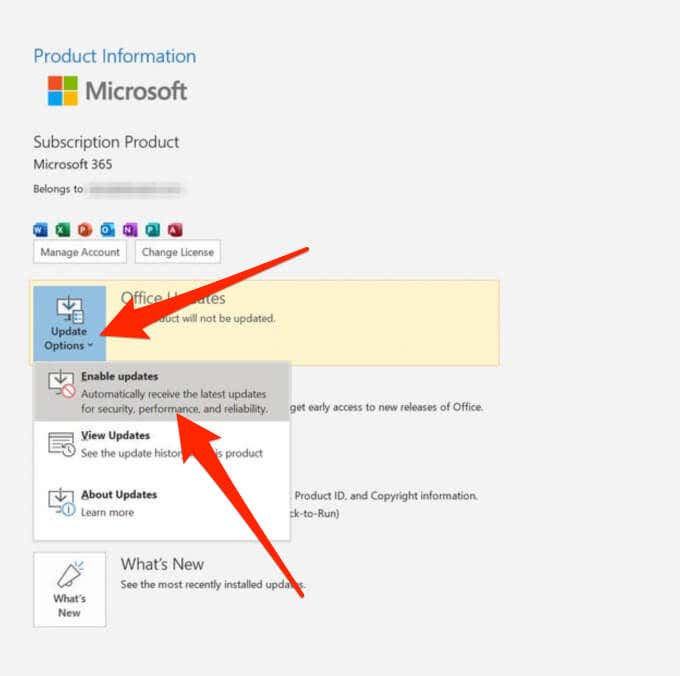
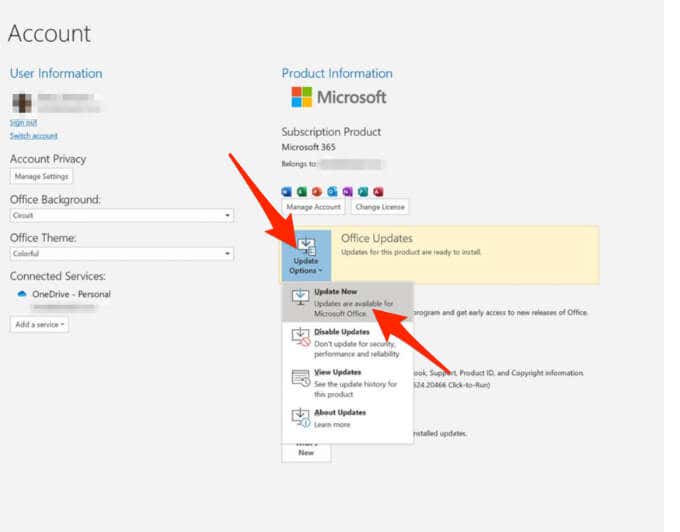
Although the Outlook application installs the updates automatically, you can also manually enable or disable those updates through your Office account settings. It’s important to check and install the latest update on your system for enabling automatic updates for Outlook. Adhere to the following points:
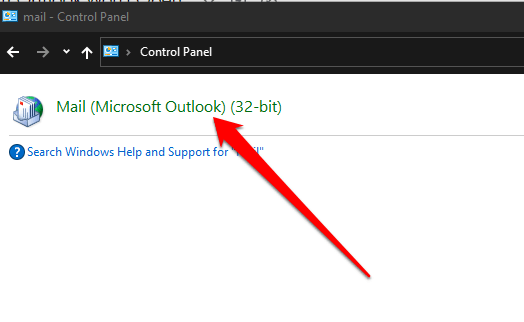
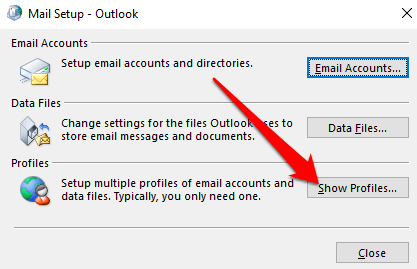
Incorrect mail server settings can also cause Outlook to not open. If you are not aware of the correct settings and are facing this problem, you may wonder how I fix Outlook not opening an issue on your device. Follow the points below to check the Outlook mail server settings.
The compatibility mode makes it seamless for users to run various programs on old operating systems. If your Outlook runs on compatibility mode, you may wonder why won’t Outlook open. In this case, disable it and then see whether the application works properly. Note that Outlook 2016 does not have a Compatibility tab. So, only the Outlook 2010 and Outlook 2013 versions users can use this method to resolve the application not opening issue.
Here are the steps you should follow:
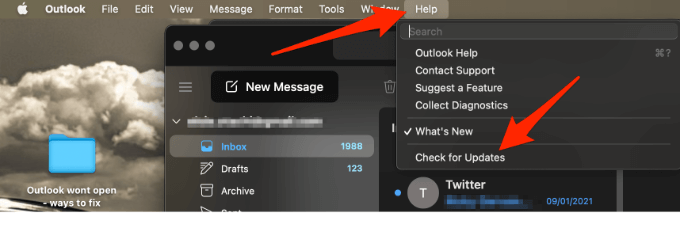
If you are a Mac user and find Outlook not opening on your device, rebuilding its database through the MS Database utility can resolve the problem. But before you begin the process to rebuild the database, ensure that you have 20 MB of disc space. It’s required to rebuild the database.
People using different versions of Outlook may find different techniques working for them. But you can be confident that one of the methods will certainly resolve the Outlook not opening problem. However, if you still cannot resolve this issue, it’s best to seek professional Outlook support services. The technical experts will diagnose and fix all kinds of glitches and errors in your MS applications.
Related:
Yahoo mail changed the password.
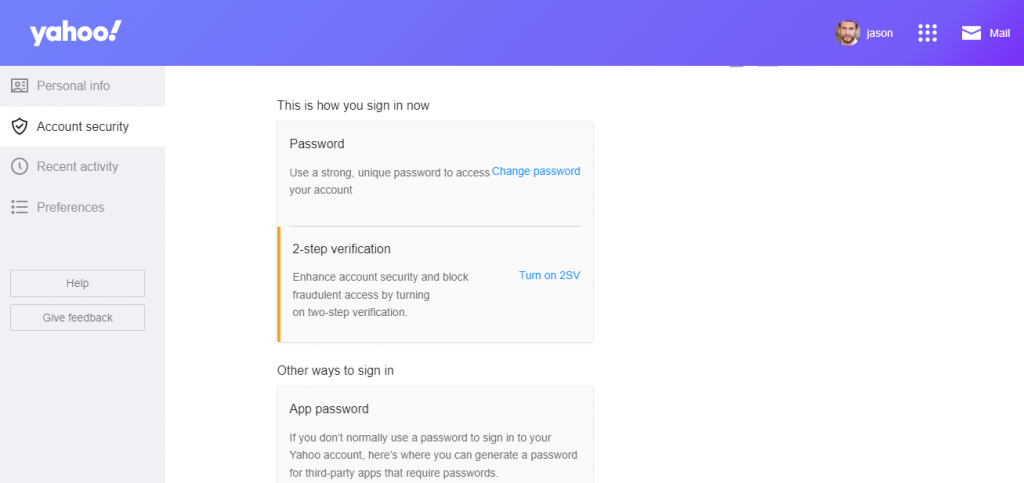
Special attention should be paid to security when it comes to online accounts. Hackers want to get Yahoo Mail login information to perform various cybercrimes. One of the most effective ways to protect yourself is to update your password regularly or call it changing the Yahoo mail password.
For users facing issues in changing the password, there are key steps to know and perform the activity. After reading the guide in this web blog, you can easily do Yahoo mail change password.
If someone who is not a traditional attacker can access a Yahoo account, and in this case, users might look forward to how to change my Yahoo password?
Users simply start using weak passwords, write down passwords, and switch between two preferred passwords. Hence, it is important to do an effective Yahoo mail change password.
It’s of course good to change your password for a particular event. It was vulnerable to Heartbleed, but it is now recommended to change the password on the patched website.
The Yahoo user might not be aware of the newly introduced Yahoo mobile application and its way to change the password. To maintain the exclusive level of security, it’s best to change the passwords for the Yahoo account.
Changing the Yahoo mail password every few months is a way to keep your account safe. That way, you can keep your personal information up-to-date with minimal risk. Adhering to the steps below will simply assist and learn how to change Yahoo password and ultimately protect your personal information as well as your Yahoo account.


Ensure your password is secure and hard to guess. Using the word “password” or using a birthday is too easy and makes you more likely to be hacked. This is because most people tend to use the same trick to keep their passwords. If you need to improve password security, check out some tips on how to create good passwords.
Following the way, the password for your Yahoo account on the mobile application will now be set.
Instead of relying on your memory to remember your new password, it’s a good idea to keep a record of your password in your password manager. That way, if you forget your new password, you won’t have to keep guessing your password to log in, you’ll be locked out of your account, you can fix re-entry issues, or you can recreate a completely new password. You can avoid doing this.
To change my Yahoo password, I initially start with signing into the Yahoo mail account first. In case I am using the mobile application I go to the setting. Similarly, you must try and follow the steps that were effective for me.
First, sign in to your Yahoo Mail account using your web browser. Follow these steps. After signing in to your account.
Once you are aware of how to change your Yahoo mail password, you might need to add additional information for yourself. This will bring additional information and help you recover the password in case of any issues.
If you don’t have access to your Yahoo Mail account, you can simply reset your Yahoo Mail password to sign back into your Yahoo Mail account.
The steps required to change your Yahoo Mail password and regain access to your Yahoo account are described below.
This option allows you to restore your Yahoo Mail account if you specify a recovery phone number for your account.
Follow these steps to continue recovery.
Following the above ways, I was able to change my Yahoo password and now I can access my account again.
Another way to recover your Yahoo Mail account requires that your account have a recovery email address. To change your Yahoo Mail password without signing in, follow these steps:
Changing your Yahoo Mail password from time to time will help protect your account. Another thing you can do to make it even more secure is to enable two-factor authentication for your Yahoo mail account. To do this, follow these steps:
Getting aware of Yahoo mail change password is simple, yet you can come across further issues while following the steps. This can be due to any reason. The situation can or cannot occur, still keeping yourself on the safer side is important. Hence, it is advised to get access to the best Yahoo customer support. The assistance from an expert and professional executive will help in getting rid of the hindrances.
Yahoo is one of the most common email platforms that millions of people use. It provides various unique functionalities that other email services don’t have. It helps people manage their contacts, calendars, send and receive emails, and schedule meetings. But it’s not that the users always have a good experience while using it. Problems like Yahoo Mail not working crop up at numerous points and hinder users from accessing their emails. If you are facing issues with this email service, you need to take suitable measures to resolve them effectively. In this article, you’ll learn the various fixes to troubleshoot this problem whenever it arises.
Before you go ahead and implement the various troubleshooting measures, you must know what’s causing Yahoo not to work. Below are some of the most common causes that will help you find why is Yahoo Mail not working.
After you pinpoint the exact cause of the problem, you can start to fix it. The instructions for fixing this problem are given in the subsequent section.
You can troubleshoot various cases related to Yahoo email not working in Windows, browsers, and iPhone and Android. Find the necessary instructions to resolve this issue in every scenario.
You can implement various techniques to resolve the mail not working problem on your browser. You can do the following.
It’s the first step you should take on encountering this problem. Disable the ad-blocker as it obstructs the Yahoo mail website from loading.
A poor internet connection often causes the browser to load the website slowly. Check the network speed through a test by using a website like speedtest.net. You can also open different websites on your browser. If they load slowly, you need to fix your internet issues. Try resetting the router or restarting it. You can also connect with your internet service provider.
Remove all stored information on your browser to improve Yahoo webmail’s search experience. Clear all caches and cookies, and you’ll find the problem resolved after that.
Windows 10 users often face problems wherein they cannot see emails on their Yahoo mail. They also find their Yahoo Mail not able to sync with the mail app of Windows 10. Users facing such problems can follow the techniques below.
Many Android users face problems in the proper functioning of their Yahoo Mail on their phones. You don’t need to deal with this problem after following the fixes below.
People reporting Yahoo Mail not working on Android need to resolve the sign-issues. The old register number causes a problem in the proper working of the Yahoo Mail app. So, you need to change it. Proceed with the following process.
If the Yahoo Mail app on your Android phone is not updated, you’ll likely face problems in using it. Often the answer to the common question why is my email not working on my Android is an app that’s not updated. Follow these steps to update it.
People also find that their Yahoo email is not working on iPhones. There are a couple of things you can do to fix this problem.
People complaining of Yahoo mail not working on iPhone should update their iOS devices. If you ignore updating your phone, it becomes vulnerable to many technical errors. In iPhone, updates get carried out automatically. Still, at times, people find their Yahoo Mail app not getting updated automatically. If you are also facing this issue, implement these steps.
Often, people find issues in the proper working of Yahoo Mail on Outlook. If you’re wondering why is my Yahoo Mail not working on Outlook, you can begin by checking the server status of Outlook and Yahoo through websites like downdetecter.com and downforeveryoneorjustme.com. After that, you can try some troubleshooting techniques specific to this issue.
The correct Yahoo Mail configuration is essential for its effective working. The correct configuration settings for third-party email clients are as follows.
Security programs do not harm Yahoo account setup on Outlook. But inappropriate permissions can interrupt the working of Yahoo Mail. The best course of action is to disable the security programs for some time when you are working on Yahoo. It will prevent the security software from interfering in its functioning. Disable your Windows Firewall and similar antivirus programs and see if Yahoo Mail works appropriately.
Various add-ons on a device can influence the proper functioning of Microsoft Outlook. Most often, it results in users desiring a solution to their question of why my Yahoo mail is not working on Outlook. So, it’s essential to stop the interference of add-ons, and you can do it by running Outlook in Safe mode. Follow this process to launch the Safe-Window mode.
There are quite many approaches that you can follow upon finding your Yahoo email service not working. All the techniques are effective and easy to follow. However, it can be possible for your Yahoo Mail to remain unresponsive even after implementing the. In such a case, you can seek Yahoo Customer Service. The expert technicians are skilled at helping users troubleshoot even the most complex issues.
Related Post: Yahoo Mail Change Password